Showing posts with label Baby. Show all posts

Thursday, June 14, 2018

Caterpillar Baby Cocoon Set with Video Tutorial


Crochet This Caterpiller Baby Cocoon and Hat set with me! This is sized for a newborn and perfect for newborn photography. Feel free to go up or down one hook size to accommodate if a bigger or smaller baby is expected.


The Materials Needed:


You will need red, yellow, brown and three shades of green yarn in a size 4 worsted weight acrylic. Here is the yarn I used:

One Skein Each:
Red Heart Super Saver CHERRY (Red)
Red Heart Super Saver SPRING (Medium Green)
Red Heart Super Saver PADDY (Dark Green)
Red Heart Super Saver HONEY DEW (Light Green)

Small Amount of:
Red Heart Super Saver LEMON (Yellow)
Red Heart Super Saver COFFEE (Brown)

I Hook
F Hook 
My Yarn Scissors
Yarn Needles


This description includes affiliate links and I might get financial compensation if you choose to click them. I appreciate your support SO much. Thank you! (((hugs)))

Monday, July 3, 2017

The Piano Cocoon and Hat


Hi everyone! I hope this post finds each of you well.

It was an amazing June but we are so excited to celebrate the 4th of July! Lots of decorating and plans for the day have taken place. But, I wanted to make a little something to commemorate the holiday. So I wrote up a pattern that several people have asked forever since I shared my first one.

It's my Piano themed Baby Cocoon and hat!

I have made lots of these and the pattern evolved over the years.

It is available on Ravelry and on Etsy.

And since it's the holiday this will be free on Ravelry until July 5th with the coupon code "Freedom". I hope that you enjoy it and that you will please tag me with any pictures that you take of it on the little ones. I just love seeing them!

Take good care!! Melody

Tuesday, September 23, 2014

Booties!


Today has been a day of booties. Yes! Just a bootie-ful day. Just full of yarn and tiny, pretty buttons and flowers. It was so nice.

I have crocheted many booties and today I mixed and mingled all my favorite parts to make some booties for baby girl that is on her way soon.

Aren't they precious?!

I have had my babies and I am happy to be past that point in my life. Still things like this just make my ovaries do a cartwheel.

I wrote up a pattern in case you would like to make some yourself. But, if not I will be happy to make something for you over at my Etsy shop in a custom order.

Saturday, October 13, 2012

Name Filet Crochet Baby Blanket with Ruffled Trim

I made a personalized baby blanket for a pregnant girlfriend. She requested it and I agreed happily...before finding out how many letters are in the name. LOL It is SERIOUSLY oblong. I prefer square baby blankets, but there was just nothing I could do. If I had it to do over again I would have made the letters only one row wide. That would have elliminated about a foot of blanket width.

Seeing how wide it would be I wanted to add some interest to the negative space. I found a fun fillet 3D flower pattern online and used that above and below the name...I just placed them randomly. I like the way they came out.
I intended to make the ruffled edge two rows wide. After one row I was "done". This took about 12 hours of work...which is more than my craft ADD likes to commit, too.

Here is my final product:


And a close up...

Thank you for looking!!!

Thursday, September 27, 2012

Piano Cocoon

This week I was sent a challenge...it was to make a piano themed baby cocoon. Here is my best attempt! It is super soft, double crochets, mostly with scalloped edges.

 
I used a rosey-pink yarn from "I Love This Yarn"
White and Black are both Vanna
 
I hook
 
The Cocoon is 15" Long, and 20" wide. I like them lose because you can always cinch it in the back with some ribbon for pictures. Getting a baby in a tight cocoon is like trying to put on jeans right after a shower. Inconventient.
 
The hat is my newborn size 12" wide x 5" deep.
 
Its pretty basic, but the pattern is coming. :)
 
Oh! and a quick shot of the back.


Wednesday, July 25, 2012

Beanie with Headphones Pattern

Hi! Just wanted to share some morning cuteness! I have seen hats with fake headphones everywhere lately and I wanted to make one for a baby I know! I want to share with you guys how I did it. (Click here to go to my Etsy shop if you would rather I make it for you)

Here is the finished product^^ Its my first try. I might do it differently next time. I'll keep you posted.

I used Red Heart Super Saver yarn. I love this color...but this skein had a very crunchy feel to it. The baby recipient has a lot of hair or I would not have chosen this. I think Impeccable yarn would also work well..but Vanna or TLC would be too "floppy". This thing literally stands up, completely formed, on its own when you set it down on a table. Which is just what I want when I am using a hat to add embellishments to. If the hat too floppy you will see where you stitched or glued things on to it once it is washed once or twice. Side Note: Gluing is NEVER as good as stitching. And don't even try glue when you are sending it to someone under five years old. Whatever it is will come off. I LOVE my Liquid Stitch...but I keep it off my baby hats because in the past it has failed the child test. 

Pattern!

Very Basic Ribbed Beanie: 

This is 3-6 month size (16" around, 6" tall) 

You will need to know front post HDC and back post HDC. Both are super simple stitches that I learned on youtube. 

J Hook

Slip stitch, chain one and make first stitch of the next row in the same stitch as chain one (for now gaps) unless otherwise noted. Do not turn. 

Gauge for Hat: 3stitches = 1" wide

In a magic circle, HDC 8 times (8)
Row 2: HDC 2 time in each stitch (16)
Row 3: HDC around increasing in every other stitch (24)
Row 4: HDC around incresing in every third stitch (32)
Row 5: HDC around (32)
Row 6: HDC around increasing in every 4th stitch (40)
Row 7: HDC around increasing in every 5th stitch (48) 3stitches = an inch, so that was 16". Keep going here if you need to :)

Row 8--11: HDC one time in each stitch around (48), (slip stitich, chain 1)
Row 12-14: Back post Half Double Crochet (BPHDC) in same stitch as chain. BPHDC in next stitch, Front Post Half Double Crochet (FPHDC) in third stitch. *BPHDC in next stitch, BPHDC in next stitch, FPHDC in next stitch* and continue *-* all the way around. (slip stitch, chain 1). (48) 

Fasten off. 

Headphone Band:

Change to black yarn. Hold two strands together as you work and still use the J Hook.

Make a chain 28. (hold it up agains the top of the hat...if you made it bigger or smaller just make sure your chain goes almost all the way across the top. This will be forming the band of the headphones. The ends will be hidden so its not necessary to be precise. It needs to be long enough to hit the circles, but not longer than the hat is from one side, across the top, to the other side.)
Then HDC in second chain from the hook and across. 
Fasten off. 

Ear Circles: (Make 2)

Still holding two strands of black yarn together.
Row 1: HDC 9 times in a magic circle. Cinch it up, slip stitch and chain 1
Row 2: HDC 2 times in each stitch around (18) 
Fasten off. 

Assembly:

I sewed the band on with a very wide (basting) stitch to keep it where I wanted it placed on the hat. Then with light grey yarn on a plastic yarn sewing needle I backstitched the circles onto the hat over the band. I just kept my stitch along the edges of the circle. They are very secure. Then once the circles are attached over the ends of this band I cute the wide stitch that was attaching the band along the top of the hat so that the bad would hover over the hat a bit. I thought it was cuter this way. :)

Work in your tails and you are done! Tada!!! 

I think I will need a Melody sized one on a purple beanie before winter come. Maybe a set for the whole family for a little family picture? 


I also made time to color my hair yesterday! I went light a few months ago and was missing my black. So its back!


I love box color <3...Darkest brown all the way. *waves*


Monday, July 23, 2012

Polka Dot Throw

You ever look at something and just say to yourself "I am gonna MAKE you"...gosh, I hope you do, or else this is going to be an awkward moment. Its not just me, is it?

Here is my latest...


It appears to just be plain old Red Heart Super Saver yarn...which I have a few (hundred) skeins of in my stash from hat making. I am going to stick as closely to this color selection as I can. Its so perky! It belongs on my couch.

I hope that you will make one with me! I will update here with my progress. First and foremost...collecting the colors in a basket.

Im off!

Happy Hooking,
Mel

Sunday, July 1, 2012

Toddler Cotton Beanie


I crocheted this flower cap out of cotton yarn for the summer. I love the bright colors! It is created to fit a little girl that is 1-2 years old. Without the flower this makes a really nice beanie for a baby boy. 

J Hook and Lily Sugar 'N Cream Yarn
17" Around and 7" deep

Hat:
Row 1: 8 HDC in a magic Circle (8)
Row 2: 2HDC in each stitch around (16)
Row 3: HDC around, increasing in Every other stitch (24)
Row 4: HDC Around, increasing in every 3rd stitch (32)
Row 5: HDC Around, increasing in every 4th stithc(40)
Row 6: HDC around, increasing in every 5th stitch (48)
Row 7-14: HDC around (48), fasten off
Change color, attach near where you just fastened off. chain 1, REVERSE SC around(48), slip stitch and fasten off.

For the flowers I use a magic circle and work allllll of the flower petals into the magic circle and then cinch it closed. 

Large back flower, use K Hook
In magic circle, *ch 2, dc, tc, dc, c3, ss into the magic circle* repeat * to * 4 times to form 5 petals. ch 1, cinch magic circle tight (it won't close and that is ok...the gap will be covered up and actually makes the sewing a bit easier), fasten off. 

Smaller flower, use J Hook and repeat the instructions for the large flower. 

Center of the flower, in magic circle, HDC 8 times, cinch closed tightly. Fasten off, leave a long tail and use that to sew the flower on to the hat with a yarn needle.


Wednesday, June 27, 2012

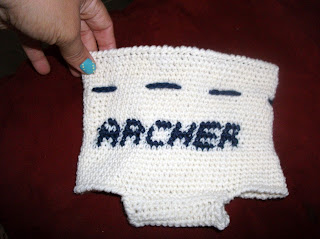
Personalized Wool Soakers

Last nights project was a quick and simple one. I did not use a pattern and really hopes it fits nicely (I'll update)...but its a little wool soaker for baby Archer. He is due to arrive on or before 3 weeks from now!!! 


Here is a brief rundown on how I made it. Please let me know if any of it any of it seems botched. :) I am always open to suggestions, too. I did not cloth diaper my boys so I am not very familiar with this. More than anything its for adorable pictures. I hope she gets some use out of it, too. But, I just cannot wait to see it on him.


F Hook
Sensations Wool Yarn (thinnish, has the feel of sport weight yarn...any thicker and I cant do the lettering)
ch 75,
1-27) sc in each stitch for 27 rows (letters were done in rows 13-17) (working in the round) (75)
28) sc in next 16 stitches, turn (16)
29) decrease1, sc 12, decrease1 turn (14)
30-42) sc across (14) turn
43) Increase1, sc 12, increase1 (16)

Sew or slip stitch row 43 to the center of the opposite side of row 27 to form what looks like a soaker. fasten off.
SC around the waistband and legs to finish.
With same or complimenting color ch 75, fasten off. 5


Featured Post

Exploring Local Creativity at the Texas State Fair