Friday, December 4, 2020

Fingerless Gloves - Free Pattern and Fun and Easy Crochet Tutorial


J/6.00  mm Crochet Hook
3.5oz of Bulky Yarn
Scissors
Yarn Needle

Gauge: 4" x 4" Square is 12 stitches wide and 7 1/2 rows tall.

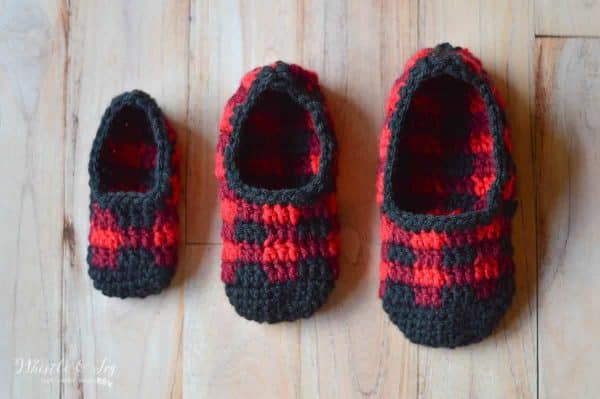
Glove Uncuffed is 10" long and 4" wide

Note:At the end of each row "chain one loosely and turn" is implied unless told otherwise.

This is for a medium set of gloves. If you want larger then add an additional 2 rows of HDC. I had enough yarn leftover from the 3.5 oz to do this so you should not need to buy more.

Create the Body of your Gloves

Chain 27,
Row 1 HDC in third chain from the hook. HDC in each stitch across (25)
Row 2-15 HDC in each stitch across (25)
Turn your work and single crochet one time into the side of each row (15-19), 

Sew up the sides of your gloves


Fold your work in half, right sides together. 
"Sew" them together with a single crochet in the first 5 stitches. 


(what we do next with form the thumb hole)
Single Crochet in the next five stitches on only one side of the glove (not sewing the two layers together. 
Then proceed to sew the glove together with single crochet stitches in the last 15 stitches
Fasten off. 
Turn the glove right side out. Make a two inch cuff on the bottom of the glove and enjoy!


Repeat the pattern for a second glove.

Let me know if you have any questions?

These are very versatile. They can be adorned with bows, buttons, ribbons...the possibilities are endless. Tag me on social media so that I can see them if you make them.

Thank you for joining me and I hope that you stay warm and joyful. 

Melody

Wednesday, November 11, 2020

Pumpkin Spice Cheesecake in a Bowl

I love making these for myself post-workout! 


PUMPKIN SPICE CHEESECAKE in a BOWL (serves 2)


1 Can of Pumpkin

2 eggs

Put the Eggs and Pumpkin in a saucepan over medium heat stirring constantly until it is warmed up and steaming. Be careful. It can sputter a bit as it warms. 

Lower heat to low and add...

2 Tablespoons of Swerve Granulated Sweetener

1 teaspoon of Vanilla Extract

1-2 teaspoons of pumpkin spice

1 teaspoon of ground cinnamon

1/2 teaspoon salt

Stir well and if you want it super decadent then add:

1 Tablespoon of Heavy Whipping Cream 

Keep stirring until the entire mixture is heated up and let it sit while you stir for 3-5 minutes so that the egg is thoroughly cooked through. Set aside to cool slightly as you are stirring take a moment to mix:

1 cup of Greek yogurt 

1 Tablespoon of Swerve (I sometimes replace this with a squirt of liquid stevia)

Give this a quick stir and divide it evenly into two bowls. 

Top each bowl with half of the cooled pumpkin mixture and stir until you get a pretty pumpkin cheesecake swirl. Enjoy!


Tuesday, November 10, 2020

White Chocolate Snickerdoodles! Grainfree/Paleo/Low Carb/Keto


These White Chocolate Chip Snickerdoodles are grain free, Paleo, Low Carb and they even hit the Keto checkmarks! Especially if you leave out the white chocolate chips. ;)

Preheat Oven to 350 degrees

Makes 15 Cookies


2 Cups of Fine Ground/Blanched Almond Flour

2 teaspoons Gluten-Free Baking Powder

1/2 teaspoon Sea Salt

1 Tablespoon Ground Cinnamon

1 cup Swerve Granulated Sweetener


Mix These in a Medium Bowl

Then Add these wet ingredients


1 teaspoon Vanilla

Add 2 Eggs

1/3 Cup of Melted Butter


Stir in

1/2 Cup White Chocolate Chips


Stir the wet into the dry ingredients.

Work Teaspoon Size Amounts into a Ball in your hands. Put them on a Non Stick Cookie Sheet. Smash them a bit into cookie rounds. Separate by 2 inches to allow for spreading while they cook. 


Cook for 12 minutes. Cool and Enjoy

Saturday, October 24, 2020

Thursday, June 25, 2020

Canada Day Crochet

It is almost July 1! Which means Canada Day.

I have rounded up several crochet patterns to celebrate and show off your Canadian pride to your friends and family (even if it is just on social media this year!). I love to celebrate along with you here in Texas. I always make a little project to we have poutine. To keep my family excited about the holiday poutine only happens on July 1 in my house. My family devours it...I have to make two trays at this point if I want any.

So, celebrate along with and show the Canadians some love!


Click the pictures to be taken to the pattern homes!


img_4932
The potholder is amazing...but this blog has a bunch of Canadian inspired crochet projects. Bags, hats...you name it. Rich Textures Crochet has it all! 


Beaver and Canadian Flag crochet patterns by PlanetJune
This beaver with the flag is amazing!


Canadian patriotic hat free canada hat pattern crochet
This hat is adorable! I think I need one.


How incredible is this corner to corner Flag Blanket!?


I am loving the maple leaf garland! So beautiful! Decorate your mantle, your car, your cubicle....your best friend.


FREE Crochet Pattern: Crochet Plaid Slippers | Make these cute slippers in classic Buffalo Plaid, perfect for chilly fall days or your Holiday list!
These plaid are so low-key Canadian that you could just wear them right on into fall. I love buffalo check in red or white.


But, whatever you do make sure you have a wonderful day and maybe...just maybe...Poutine.

Authentic Canadian Poutine Recipe

Saturday, December 21, 2019

Stargazing Earwarmer - Free Crochet Pattern and Tutorial


Hi Friend!

I made a new pattern for a star stitched ear warmer in lovely, LOVELY Patons Roving Yarn. Its untwisted, wooly beauty. The idea came to me while I was catching up with (binging) Jonna Jinton on youtube. She had this amazing ear warmer and I just needed one...to complete my transformation into an ethereal Swedish blond woman that dances in the forest, plunges into sub-freezing water and (of course) calls cows. She is amazing. Balancing rocks on one another in the river and painting with natural materials by candlelight. It's incredibly relaxing to watch (except the mosquitos! Eww) 


So...where was I. In an effort to connect to this amazing lifestyle I needed my own white, wooly ear warming. Would you like to make one, too? If so the written pattern is here. And the video of exactly what I did is just down below.


And here is the printable pattern!

I hope that you enjoy it!


Thursday, December 12, 2019

Slouchy Beanie Tutorial! Video and Free Written Pattern


Slouchie Beanie Pattern

Materials

One Ball of Size 4/Medium Weight Yarn (I used Caron Simply Soft Sparkle (in Red) and

I hook (5.5mm) for teens and ladies 
J (6mm) hook for men

Stitches Used: 
Magic Circle (MC)
Chain (Ch)
Slip Stitch (SS)
Double Crochet (DC)
Increase DC (IncDC)
Single Crochet (SC)
Back Loop Single Crochet (BLSC)
Single Crochet Decrease (SCDec) 

Notes
  • Ch2 does not count as a stitch.
  • Do not turn at the end of any rows.
  • Leave a 4”+ Tail in your Magic Circle to weave in and secure afterward.
  • Do not fasten off before beginning brim. The separation of sections is just in case you made more or less than 17 rows when creating your choice of length.
  • In the video I move seamlessly from the 3 *SCDec + 1 BLSC* at the end of row three into the 2 *SCDec + 1 BLSC* at the begining of row 4. That is why I say to do it FIVE times. Please, forgive any confusion. 

Start with a Magic Circle (or chain 4 and slip stitch)
Row 1, ch2, 12 DC into MC over tail. SS (12)
Row 2: ch2, IncDC into each stitch around. SS. (24)
Row 3: ch2, *1 DC + Inc DC* around. SS. (36)
Row 4: ch2, *2 DC + IncDC* around. SS. (48)
Row 5: ch2, DC around (48)
Row 6: ch2, *3 DC + IncDC* around. SS. (60)
Row 7: ch2, *4 DC + IncDC* around. SS. (72)
Row 8-17+: ch2, DC across. SS. (72)

Begin Brim 
Row 1: ch1, SC around. (Do not SS or ch...we are working in a spiral).
Row 2: 64 BLSC (Leaves 8 unworked stitches) *SCDec +  2 BLSC* 2 times (70)
Row 3: *SCDec +  2 BLSC* 3 times and continue to BLSC across until the stitch before the
first SCDec in the previous row. *SCDec +  1 BLSC* 2 times.(65)
Row 4: *SCDec +  1 BLSC* 3 times and continue to BLSC across. (62)
Row 5-7: BLSC across. (62)
Fasten Off, Weave in Ends.


Friday, November 8, 2019

Scrunchy - Easy Crochet Tutorial to make a Scrunchie


Scrunchies are back! Velvet, bulky, silky...you name it. They are fun and everywhere since the VSCO girl trend began growing. Then the 90s kids began to feel nostalgic and now were all filling our wrists up. But, they are pricey! So lets make our own.

I hope that you will stop by and crochet some scrunchies with me! It's a fast and fun tutorial that is aimed at everyone (including beginners!).

Just in case you are not in a position to watch the video...here is a breakdown of the instructions.

Materials:

Bernat Velvet Yarn is sold here: https://amzn.to/2Nus6mT J Crochet Hook: https://amzn.to/2G69DLe My favorite Scissors: https://amzn.to/2WCynj9 My favorite Stitch Markers: https://amzn.to/2G722vD


-Tie the yarn onto the hairband with a double square knot.


-With nondominant hand stretch the band open with your thumb and index
finger. Stretch the yarn above and use your other fingers to keep the
tension on your working yarn. 


-With your dominant hand take your hook from under the band and draw up a
loop of the yarn. Use the hook to grab the yarn over the band and pull
through to chain once. SC around the band until the band is covered, but
not so much that the band is stretched. 


-Make certain that your stitches are not twisted and have the Vs that your
stitches form all along the outside of the band. 

-Slip Stitch into the top of the first chain. Chain 2 (do not turn)


-DC 4 times into the top of each stitch across.

-SS into the top of the first DC. Fasten off. Work in ends. 

Love,
Melody


Friday, September 20, 2019

Mary Jane Slippers! Free Easy Crochet Pattern


Hi Friends! I just finished recording the video for my Mary Jane Crochet Slippers. This pattern is so easy and so fast. I have been making these for the last few weeks. I cannot seem to stop collecting Bernat Blanket Yarn ever since I designed these. I hope you like them as much as I do!


The free printable and downloadable PDF Or keep scrolling if you would like to read it from the blog. 

The Video:


The written pattern:


Mary Jane Slippers

Finished Size: Women's Medium-Large. Size 7-10. They are very adaptable but if you need more or less length just keep crocheting the back of the slipper or stop early. 


Materials

One Ball Bernat Baby Blanket. I get the 300-gram ball to make 3 pair, but the small-sized ball will give you one pair of slippers


Stitch Legend (US Terms)
Ch - Chain
SS- Slip Stitch
HDC - Half Double Crochet
SC - Single Crochet
FO - Fasten Off
IncHDC - Increase Half Double Crochet (two Half Double Crochet in the same stitch)
DecHDC - Decrease Half Double Crochet (Yarn Over, Insert into next stitch, draw up a loop, Yarn Over, 
insert into the following stitch, draw up a loop, yarn over and pull through all five loops on your hook)
YO - Yarn Over


Pattern


1
Work 8 HDC into a Magic Circle SS into the first HDC of the row and Ch1
2-3
*1 HDC, IncHDC* Repeat * to * across. SS into the first HDC of the row and Ch1 (12, 18)
4
*1 HDC, 1 HDC, IncHDC* Repeat * to * across. SS into the first HDC of the row and Ch1 (24)
5-6
HDC Across. SS into the first HDC of the row and Ch1 (24)
7-9
Turn. HDC in the next 17 stitches. Ch1 (17)
10
Chain 7, SS into the first HDC of the last row. Ch1 and turn. SC into the next 7 chains. HDC into the next 17 HDC.  (24)
11
Turn. HDC Across the next 17. Ch1 (17)
12
Turn. 1 HDC in the first 4 Stitches. DecHDC. HDC in the 5 Stitches. DecHDC. HDC in the next 4 Stitches. Ch1 (15)
13
Turn. HDC Across the next 15. Ch1 (15)
14
Turn. 1 HDC in the first 3 Stitches. DecHDC. HDC in the 5 Stitches. DecHDC. HDC in the next 3 Stitches. Ch1 (13)
15
Turn. HDC Across the next 13. Ch1 (13) 

Continue until the length of your foot is covered. This should be enough for a size 7-9 women's foot, though.  


16
Turn. HDC in the next 4 Stitches, Skip a Stitch. SS into the next 2 stitches. (4)
14
Turn. HDC Across. Ch1 (4)
15
Turn. HDC Across. SS into the chain 2 stitches beyond the last SS.  (4) 

Turn the slipper so the right sides are facing in and SS the 4 HDC of the row to the last 4 unworked HDC of row 15. 


This will form a slipper. But we need edging. We will now work a row along the top of
the slipper and strap. 
16
Ch1, and DecSC over the first two stitches. SC until the stitch before the strap begins.

DecSC over the next two stitches. SC in the next 5 stitches. DecSC.
SC until the last two stitches of the row. DecSC. 
15
Repeat Rows 1-16 for a second slipper. 

Wear and be cozy.


By MelodyCrochet copywritten 2019 - Enjoy! (and by enjoy I mean share on social media and tag me @MelodyCrochet because I love
to see what you guys make!!). Feel free to sell what you make. Please, do not sell or alter my actual pattern as your own. Linking and
sharing my blog is ALWAYS appreciated. Happy making and Thank you for coming. I really do appreciate it!


I am an Amazon affiliate.  This post contains links and if you click on them I may be compensated. Thank you in advance for your love and support!

Featured Post

Heart Granny Square Crochet Tutorials - Easy for Beginners